Thursday, April 21, 2016

Home Repair #2: Black Water Valve

OK I know what your thinking... Yuk....Black tank repairs sounds like something you don't really want to do yourself.  Anyway yuk factor aside here is how it went.

At some point on this last trip I noticed the black dump valve wouldn't close all the way, actually not just some point but in Bisbee, AZ!  I was 100% certain something was just lodged in the valve. I already had a tank flushing adapter but I went out and bought one of these as my current one didn't have a valve.


Camco Flush Pro Holding Tank Rinser with Valve


With this attached at least I wasn't leaking sewage all the time!  Unfortunate for any neighbors these things are all clear so some amount of brown liquid was often visible. If it wasn't windy I did cover it with a towel, but I can only imagine what people on the roads thought about that valve sticking out the side of the trailer.

At basically every campsite we had access to water and dump at our site I tried to flush out the tiny blockage by filling and flushing lots of water through the system.  Alas it never worked. But I can tell you I probably have the cleanest black water water tank of any RV.

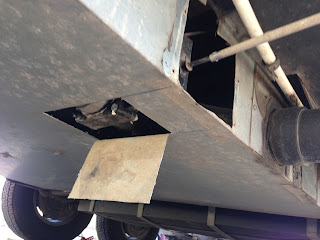
Working under the trailer is never fun! I did put as many boards under this side of the trailer to give me some room but it still wasn't much.

After removing the cover over the tank flush valve it was clear I needed more access to unscrew and replace the valve. So armed with my trusty Dremel cutting wheel I cut an access panel from the bottom of the tank pan.
Dropping the entire pan was an option but I decided overkill. My hatch was near perfect. I had previously bought a replacement valve on the inter-webs as camping stores only carry models with short handles and the Airstream has a long extension attached to the valve.

Replacing the valve was only a matter of 4 bolts and sliding the new valve in place and replacing the bolts. OK it was actually harder than that. It did turn out there was what I think was some kind of cleaning wipe lodged in the valve or at least a tiny portion of one.  Looking back I think I could have snaked some kind of stuff brush up the system and probably dislodged it.  Other than the wipe the valve was in good shape, I could probably have skipped replacing it and just put it back but I already had the new one and it only cost 10$.

Friday, April 1, 2016

First post trip repair: Inverter

Losing the inverter (An inverter provides us limited AC power when running on our batteries) on the trip really wasn't too much of a big deal. We only use it for the TV, Smoothies and charging laptops.  We also travel with a generator so that is always a last resort option for power.

Getting it replaced was more of a big deal, of course the model we have is no longer produced and we checked in a various RV shops on the way home and basically no one keeps inverters in stock. Every place could get a reasonable replace inverter in 48 hours... except we were on the road home and didn't want to stick around anyplace that long.

Probably for the best as the markup at the RV stores was around 100%!  After we got home I searched online and found the new model used in Airstreams online for a reasonable price.


RV Trailer ARTERRA DIST 5100 Series Inverter - Wf5110H Power Inverter


This inverter gives a little more power than our previous model, 1000 Watts up from 600 which I guess is cool we don't really need the extra watts. It was a tiny bit bigger than the old one but still managed to fit in the same under-bed nook.

It wasn't too hard to wire up although a word of warning Airstream does not wire inverters through the trailers battery disconnect. They are wired directly to the battery. If you aren't careful and disconnect the battery entirely you will blow a fancy and hard to find fuse!
Of course things are never easy.... One of the main reasons for picking this model was the hope it would be pretty much plug and play with the wiring of the Airstream as it is the model they use today.

First snag was the original switch had a round hole and this switch of course a square one. I don't really enjoy cutting my trailer but a cut off wheel on the Dremel does a pretty clean job.

Second an much more annoying snag was a change from the original electronic switch to a simple mechanical switch. And of course they couldn't both use the same RJ-xx phone connector... no that would be too easy.  After trips to a few electronic stores looking for adapters I had to give up and just wire up new connectors on both ends of the wire that runs through the trailer.  At least that was possible because running a new wire was not.  I could have just put the switch next to the inverter on the side of the bed but who wants to run all the way to the bedroom to turn on the electricity to make a smoothie!